

BeagleBone Black Running Ubuntu: Part2 (Plus Ruby on Rails)
06 Jan 2014
Part one of this series shows how to install Ubuntu on the BeagleBone Black. We used a MacBook Pro to burn an Ubuntu disk image onto an SD card, and then we booted a BeagleBone Black from the image we created.
This post, part two, covers the installation of the Ubuntu GUI, Ruby, and Rails. All of the commands in this article are run on the BeagleBone Black.
Node.js bonus: Rails requires a JavaScript runtime, and Node.js offered the quickest way to fulfill this requirement. Details appear within.
Gotcha: Partition Size
At the end of part one, we successfully booted the Bone with the Ubuntu command line interface. Now it’s time to add the GUI. Two things to know about the Ubuntu GUI installation…
- The partition we created on the SD card (in part one) is too small to hold the Ubuntu GUI. Solution: The SD card has some extra room, and we can re-size the partition.
- We can install the Ubuntu GUI with a single line command. But it takes an hour for the Bone to download, compile, and install all of the GUI libraries.
If we try to install the GUI with insufficient space, the installation will fail midway and we will have wasted half an hour. So it’s best to re-size first.
Doing Our Own Re-Sizing?
Why didn’t the partition have the right size when we originally downloaded the image file? Good question.
My guess: The image file was designed to be as small as possible in order to minimize download time. That makes sense. I plan to test this theory by creating a new image with a larger partition size and a pre-installed GUI. If the test is successful, results will be posted on this blog. If the mission fails, then the secretary will disavow any knowledge…
How to Re-Size the Partition
df is the Unix ‘disk free’ command. It shows used/available disk space.
ubuntu@ubuntu-armhf:~$ df

Filesystem     1K-blocks    Used Available Use% Mounted on
rootfs           3778576 2722944    885776  76% /
/dev/root        3778576 2722944    885776  76% /
devtmpfs          253580       4    253576   1% /dev
none               50748     608     50140   2% /run
none                5120       0      5120   0% /run/lock
none              253728     204    253524   1% /run/shm
/dev/mmcblk0p1      1004     480       524  48% /boot/uboot
/dev/mmcblk1p1     65390    6536     58854  10% /media/boot
/dev/mmcblk1p2   1748200    2664   1655068   1% /media/rootfs

ubuntu@ubuntu-armhf:~$
ll is one of the useful aliases built into Ubuntu’s .bashrc file. We
can use it to examine the partitions on the SD card.
ubuntu@ubuntu-armhf:~$ ll /dev/mmcblk*

brw-rw---- 1 root disk 179,  0 Jan  5 15:37 /dev/mmcblk0
brw-rw---- 1 root disk 179,  1 Jan  1  2000 /dev/mmcblk0p1
brw-rw---- 1 root disk 179,  2 Jan  1  2000 /dev/mmcblk0p2
brw-rw---- 1 root disk 179,  8 Jan  1  2000 /dev/mmcblk1
brw-rw---- 1 root disk 179, 16 Jan  1  2000 /dev/mmcblk1boot0
brw-rw---- 1 root disk 179, 24 Jan  1  2000 /dev/mmcblk1boot1
brw-rw---- 1 root disk 179,  9 Jan  1  2000 /dev/mmcblk1p1
brw-rw---- 1 root disk 179, 10 Jan  1  2000 /dev/mmcblk1p2

ubuntu@ubuntu-armhf:~$
fdisk will resize the partition we’re after. root priviledges are required to modify the partition table, so we’ll use sudo. The standard sudo disclaimer applies.
A few useful fdisk commands:
pprints the partition table.ddeletes a partition.ncreates a new partition.wwrite new information to the partition table.qquits fdisk.
Here’s the plan: In order to increase the size of /dev/mmcblk0p2, we will delete it, and then re-create it with a larger size. Note the use of the d and n commands in the following sequence. When fdisk asks us for the new partition number, type, first sector, and last sector, we will choose the defaults. Choosing the defaults will use all of the available space on the SD card.
Your numbers will vary depending on the size and configuration of your SD card, but the general procedure will be the same.
ubuntu@ubuntu-armhf:~$ sudo fdisk /dev/mmcblk0
[sudo] password for ubuntu:

Command (m for help): p

Disk /dev/mmcblk0: 3965 MB, 3965190144 bytes
4 heads, 16 sectors/track, 121008 cylinders, total 7744512 sectors
Units = sectors of 1 * 512 = 512 bytes
Sector size (logical/physical): 512 bytes / 512 bytes
I/O size (minimum/optimal): 512 bytes / 512 bytes
Disk identifier: 0x80008000

        Device Boot      Start         End      Blocks   Id  System
/dev/mmcblk0p1   *        2048      133119       65536    e  W95 FAT16 (LBA)
/dev/mmcblk0p2          133120     1638399      752640   83  Linux

Command (m for help): d
Partition number (1-4): 2

Command (m for help): p

Disk /dev/mmcblk0: 3965 MB, 3965190144 bytes
4 heads, 16 sectors/track, 121008 cylinders, total 7744512 sectors
Units = sectors of 1 * 512 = 512 bytes
Sector size (logical/physical): 512 bytes / 512 bytes
I/O size (minimum/optimal): 512 bytes / 512 bytes
Disk identifier: 0x80008000

        Device Boot      Start         End      Blocks   Id  System
/dev/mmcblk0p1   *        2048      133119       65536    e  W95 FAT16 (LBA)

Command (m for help): n
Partition type:
   p   primary (1 primary, 0 extended, 3 free)
   e   extended
Select (default p): p
Partition number (1-4, default 2): 2
First sector (133120-7744511, default 133120):
Using default value 133120
Last sector, +sectors or +size{K,M,G} (133120-7444511, default 7744511):
Using default value 7744511

Command (m for help): p

Disk /dev/mmcblk0: 3965 MB, 3965190144 bytes
4 heads, 16 sectors/track, 121008 cylinders, total 7744512 sectors
Units = sectors of 1 * 512 = 512 bytes
Sector size (logical/physical): 512 bytes / 512 bytes
I/O size (minimum/optimal): 512 bytes / 512 bytes
Disk identifier: 0x80008000

        Device Boot      Start         End      Blocks   Id  System
/dev/mmcblk0p1   *        2048      133119       65536    e  W95 FAT16 (LBA)
/dev/mmcblk0p2          133120     7744511     3805696   83  Linux

Command (m for help): w
The partition table has been altered!

Calling ioctl() to re-read partition table.

Warning: Re-reading the partition table failed with error 16: Device or resource busy.
The kernel still uses the old table. The new table will b eused at
the next reboot or after you run partprobe(8) or kpartx(8)
Syncing disks.

ubuntu@ubuntu-armhf:~$
The warning/error message at the end just means that we need reboot the Bone before the partition table takes effect.
Reboot the BeagleBone Black, holding down the boot switch (closest to the USB port) to ensure that we boot to the system on the SD card instead of the eMMC.
After the Bone reboots, run resize2fs to expand the partition created above.
ubuntu@ubuntu-armhf:~$ sudo resize2fs /dev/mmcblk0p2
[sudo] password for ubuntu:
resize2fs 1.42.5 (29-Jul-2012)
Filesystem at /dev/mmcblk0p2 is mounted on /; on-line resizing required
old_desc_blocks = 1, new_desc_blocks = 1
The filesystem on /dev/mmcblk0p2 is now 951424 blocks long.

ubuntu@ubuntu-armhf:~$
And now we have enough room to install the Ubuntu GUI.
Installing the Ubuntu GUI
Update (Feb2014): In the comments below, Jonathan Chan describes how he updated the desktop installation files before installing the Ubuntu desktop. To update the desktop installation files, grab the latest list of packages (update) and then upgrade the packages that need it.
$ sudo apt-get update

$

$ sudo apt-get upgrade

$
After the partition on the SD card has been resized, this command will intall the GUI. The command is short, but the process takes about an hour:
$ sudo apt-get install ubuntu-desktop
When installation and compilation are complete, Ubuntu will return to the command prompt. Here’s how to reboot:
$ sudo reboot
Several minutes later, the Ubuntu 12 GUI will appear. Congratulations! Login using the default credentials (login: ubuntu, pw: ubuntu) to get to the Ubuntu desktop.
Gotcha: Running RVM
I prefer to use the Ruby Version Manager (RVM) for bouncing between Ruby versions. RVM misbehaved, initially. Then I learned something special about RVM’s interaction with Ubuntu. From the RVM support pages…
For RVM to work properly, you have to set the ‘Run command as login shell’ checkbox on the Title and Command tab inside of gnome-terminal’s Settings page.
This image shows the checkbox mentioned in the quote. It’s inside of the lower red rectangle.
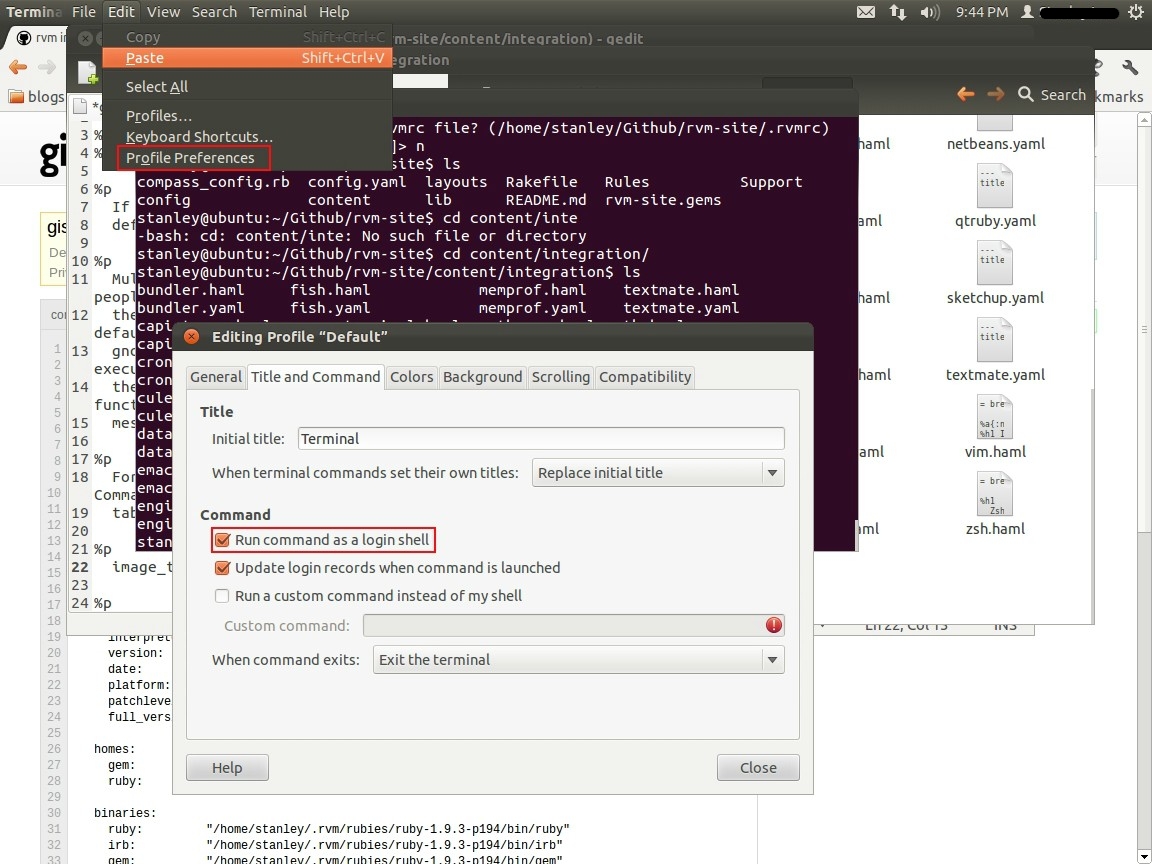
Details are in the RVM support article Integrating RVM with gnome-terminal.
Gotcha: Ruby Installation
Ruby installation initially failed (speculation) because the Bone went into power save mode during the installation process. Ruby installed successfully on the second try when I kept the machine awake by moving the mouse. This power save hypothesis has not been thoroughly tested.
Gotcha: Rails Installation

Rails needs a JavaScript runtime in order to function. Here are two ways to meet this requirement:
- Install Node.js, or
- Install therubyracer gem.
Installing therubyracer did not work for me. But Node.js installed quickly, like so:
$ sudo apt-get install nodejs
Now that we have a JavaScript runtime, Rails runs successfully.
Side note: If you want to see what a Node.js-equipped Bone can do, check out OpenROV.
Conclusion
Bottom line: Ruby, Rails, and Ubuntu can run successfully on BeagleBone Black, with Node.js as a bonus.
The BeagleBone Black is a cool option for running Ubuntu. Yes, it runs slower than a typical laptop. But it runs, and at $45 each we can build a cluster of Bones if we’re concerned about performance!
What an amazing bundle of technology.
You might also be interested in Ruby on Raspberry Pi.