

How to Record Screencasts With or Without QuickTime
12 Jan 2016![]() Live coding in front of an audience can be exciting, except when there’s a glitch. Make one typo during your demo and you could spend the rest of the presentation troubleshooting while hundreds of onlookers watch you struggle. Not fun. I’ve been there, and it hurts.
Live coding in front of an audience can be exciting, except when there’s a glitch. Make one typo during your demo and you could spend the rest of the presentation troubleshooting while hundreds of onlookers watch you struggle. Not fun. I’ve been there, and it hurts.
Feel the Pain and Fix It
One day, after causing a live coding hiccup during a presentation, I vowed to squash all typos by recording my demos in advance instead of live typing. Tools of choice:
-
For software recording, Apple’s QuickTime
-
For hardware recording, Elgato Game Capture HD60
This post shows how QuickTime and Elgato can work for you.
Using QuickTime
If you have a Mac with QuickTime installed, you have everything you need. Yes, there are other screencast tools out there. I use QuickTime because it’s simple and it comes pre-installed on the Mac. Here’s a procedure that works:
-
Setup your desktop exactly as you want it to appear in the recording.
-
Go into your
Applicationsfolder and start QuickTime. -
Choose
File|New Screen Recording. Decide whether to include audio with your recording. I rarely include audio because most of my screen recordings are for live presentations where I will be present and speaking to a live audience. -
Drag your mouse to specify the area of the screen that you want to record.
-
Click the red
Recordbutton. -
Do your demo. It doesn’t matter what you do, everything within the selected recording area will be recorded.
-
Click the
Stopbutton when you’re done. Gotcha: The first time I recorded with QuickTime, it took me several minutes to find the stop button! It’s the round black dot on the top menu bar. -
Save your video, and trim it as desired.
-
If you’re using Apple’s Keynote presentation software, you can add the video to your presentation via drag & drop.
Congrats… no more live typing!
Hardware for Recording HDMI Output
Another gotcha: I banged my head against the wall for several days, exploring multiple screencast recording alternatives for Linux on the Parallella. None of the software solutions worked as required. But one hardware solution, smaller than an iPhone and available for $150 at Best Buy, worked immediately: Elgato HD60.
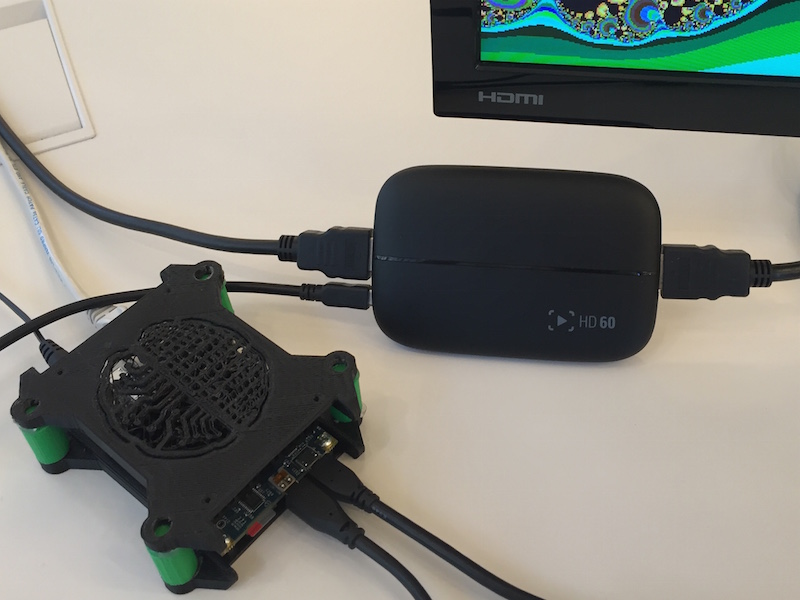
This image shows a Parallella (with green case supports), Elgato HD60 (rectangular with rounded corners), and an HDMI monitor.
The Elgato even records screen activity from the Parallella’s frame buffer. The Elgato can record anything that gets displayed on an HDMI monitor. Recording is easy because the Elgato sits right in the middle of the HDMI flow; it connects to the Parallella’s HDMI output and the monitor’s HDMI input. If you’re recording screen activity on Parallella running Linux, save yourself a headache and use an HDMI capture device like Elgato.
Shorter Videos are Better
Personal preference: I think that short (less than 30 seconds) videos are better for a live presentation. Thirty seconds is enough time to demonstrate a point, but not so long that the audience gets bored watching a video. This Parallella presentation includes multiple 10- to 30-second videos showing prime number calculations. Some are recorded via QuickTime, others with the Elgato hardware. The videos are woven together with other material.
More Value for the Audience
Typing in front of a live audience presents challenges. It can be powerful, but like any live performance, it needs to be virtually flawless in order to work well. The important part of software development is the thinking, not the typing. When we record the typing in advance, we reduce the risk of glitches and we deliver more value for the audience.