ESC Programming and Calibration for OpenROV
21 Aug 2014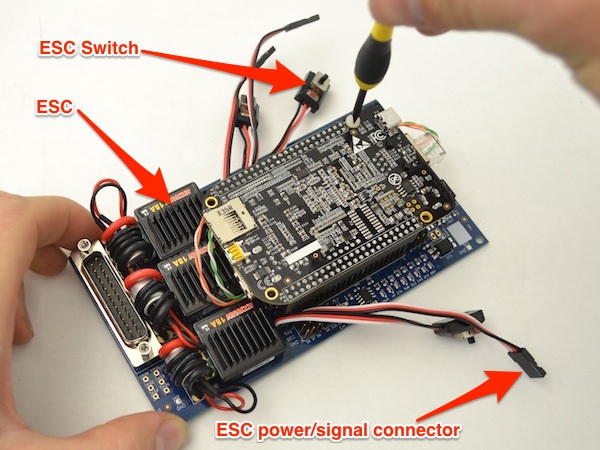
ESCs: New Experience for Me
Electronic speed controllers (ESCs) were completely new to me when I first assembled my OpenROV. This article documents my initial misunderstanding (and eventual understanding) of ESCs so that future builders can move forward with fewer glitches.
The photo at the top of this page shows an OpenROV controller board, a BeagleBone Black, and three ESCs. This article will focus on the ESCs.
Remember This About ESCs
Until all three ESCs are programmed and calibrated, the OpenROV might behave erratically. For example…
- The servo that moves the camera up and down will not respond to keyboard commands.
- When you turn one ESC switch on, an unrelated motor (or motors, plural) might start spinning. In my case, turning on one ESC (any of the three ESCs) caused two motors to spin.
In my case, the programming was correct, but I dropped the ball on calibration. And when the motors responded out-of-sync with the switches, I thought I had soldered some connections incorrectly. De-soldering and re-soldering connections would have been a ton of extra work, and that would not have solved the problem.
I reached out to the forum where OpenROV engineer Brian Adams pointed me in the right direction. Brian’s diplomatic response could be summarized as RTFM. So I re-RTFM’d, and it worked!
The bottom line: Do the ESC programming and calibration first. If the OpenROV misbehaves, re-check programming and calibration before considering other solutions.
Why Use ESCs?
Since ESCs require so many steps (programming and calibration) we might logically ask: Why use ESCs at all? Why not use simple analog motors without controllers and call it a day?
We use ESCs because the benefits outweigh the work required to configure them. It’s all about control. By using an ESC to control each motor, we can use software to specify the exact number of RPMs and direction for each motor. We can make any motor (or combination or motors) start, stop, or change direction on a dime. Even better: When we move a lever on our controller of choice (keyboard, game controller, etc.) software on the OpenROV controller board decides the exact number of RPMs for each motor at that instant. OpenROV pilots don’t need to think about this process while it happens. It just works.
The pilot’s finger moves a controller lever. The lever position gets sent to software on the OpenROV controller board, and the controller board tells each ESC what its corresponding motor should do.
In summary, we use ESCs so that OpenROV pilots can have greater control over movement.
How to Re-Check ESC Programming
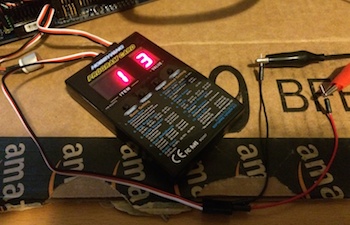
Those of you with ESC experience already know about ESC program cards. I first learned about the cards while researching this problem. Amazing devices! Yes, it is possible to program ESCs using the series of button pushes and beeps in the OpenROV instructions. That’s what I did, and it works. But a program card is faster. Amazon sells ESC program cards for less than fifteen dollars each. Well worth the investment, especially if you’re programming ESCs for several OpenROVs.
ESC Calibration Gotcha
ESC calibration was tricky for me because turning on any of the three ESC switches caused two of my motors to spin: vertical and port. Further, since my electronics chassis was (mostly) assembled by the time I got to the calibration step, it wasn’t easy for me to trace each power switch to its corresponding ESC.
So here’s what I had to do.
- First, I took everything apart, while keeping the electronic leads (those which had already been soldered) intact. I needed to do this so I could see where each wire was going.
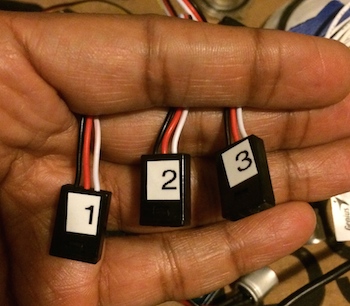
- Next, I labeled the back of each ESC switch with its corresponding ESC number. I did not want to go through the disassembly step again! The Brother P-Touch label maker was perfect for this step.
- Finally, I followed the ESC calibration steps while ignoring the behavior of the motors. For example, turning on ESC1 caused the motors connected to ESC1 (port) and ESC2 (vertical) to spin. I ignored the motors while plowing through OpenROV’s written calibration steps.
Modified Calibration Steps
Here are the OpenROV calibration steps, with slight tweaks based on my personal experience.
- Each ESC switch has a red reset button. To turn the ESC on, move its slider switch toward the red reset button. The off position is in the opposite direction.
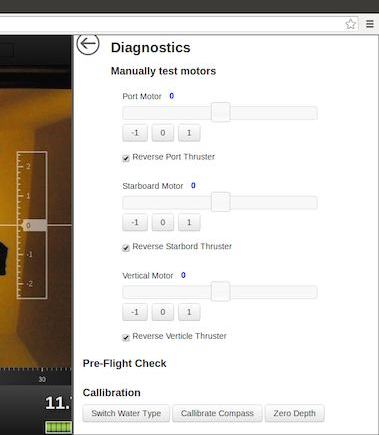
- With all of the ESCs switched off, go ahead and power up the OpenROV. The motors should remain stationary at this point. Connect with the cockpit software and open the diagnostic pane.
- Grab one ESC switch, and hold down its red reset button while powering it on. (At this point, two of my motors began spinning, V and P. I ignored the spinning motors while plowing through the rest of the steps.) You will hear a beeping noise. Let go of the reset button. (It will keep beeping which is fine). While it’s beeping, the red LED inside the corresponding ESC will flash in rhythm with the beeps.
- Press reset once and you should hear a single beep. Move that motor’s slider all the way to the right (or click the “1”) and then press the reset on the ESC again. You should get 2 beeps. The motor will not move during this step.
- Move that motor’s slider all the way to the left (or click the “-1”) and then press the reset on the ESC again. You will hear three beeps.
- After a few seconds the motor will begin to spin. Switch off the ESC, and the motor will stop spinning.
- Move the slider back to the middle (or click the “0”).
- Repeat these steps with the next ESC until all three ESCs are done.

After calibration:
- With all three ESCs powered on, the motors remained stationary, as expected.
- Each motor responded to the correct slider within the cockpit software’s diagnostic pane.
- The up/down servo for the camera responded correctly to the Q, A, and Z commands.
- The motors responded to keyboard commands, as described within the cockpit’s quick reference guide.
In other words, calibration worked when I ignored the behavior of the motors while plowing through the steps.
Success
There is great satisfaction in solving an elusive problem. The OpenROV forum proved to be a powerful and useful resource. Next step: Piloting the OpenROV in Lake Michigan.
Photo acknowledgement: The original version of the ESC photo was published in the OpenROV assembly manual. Thanks OpenROV team!
