Ruby on Raspberry Pi
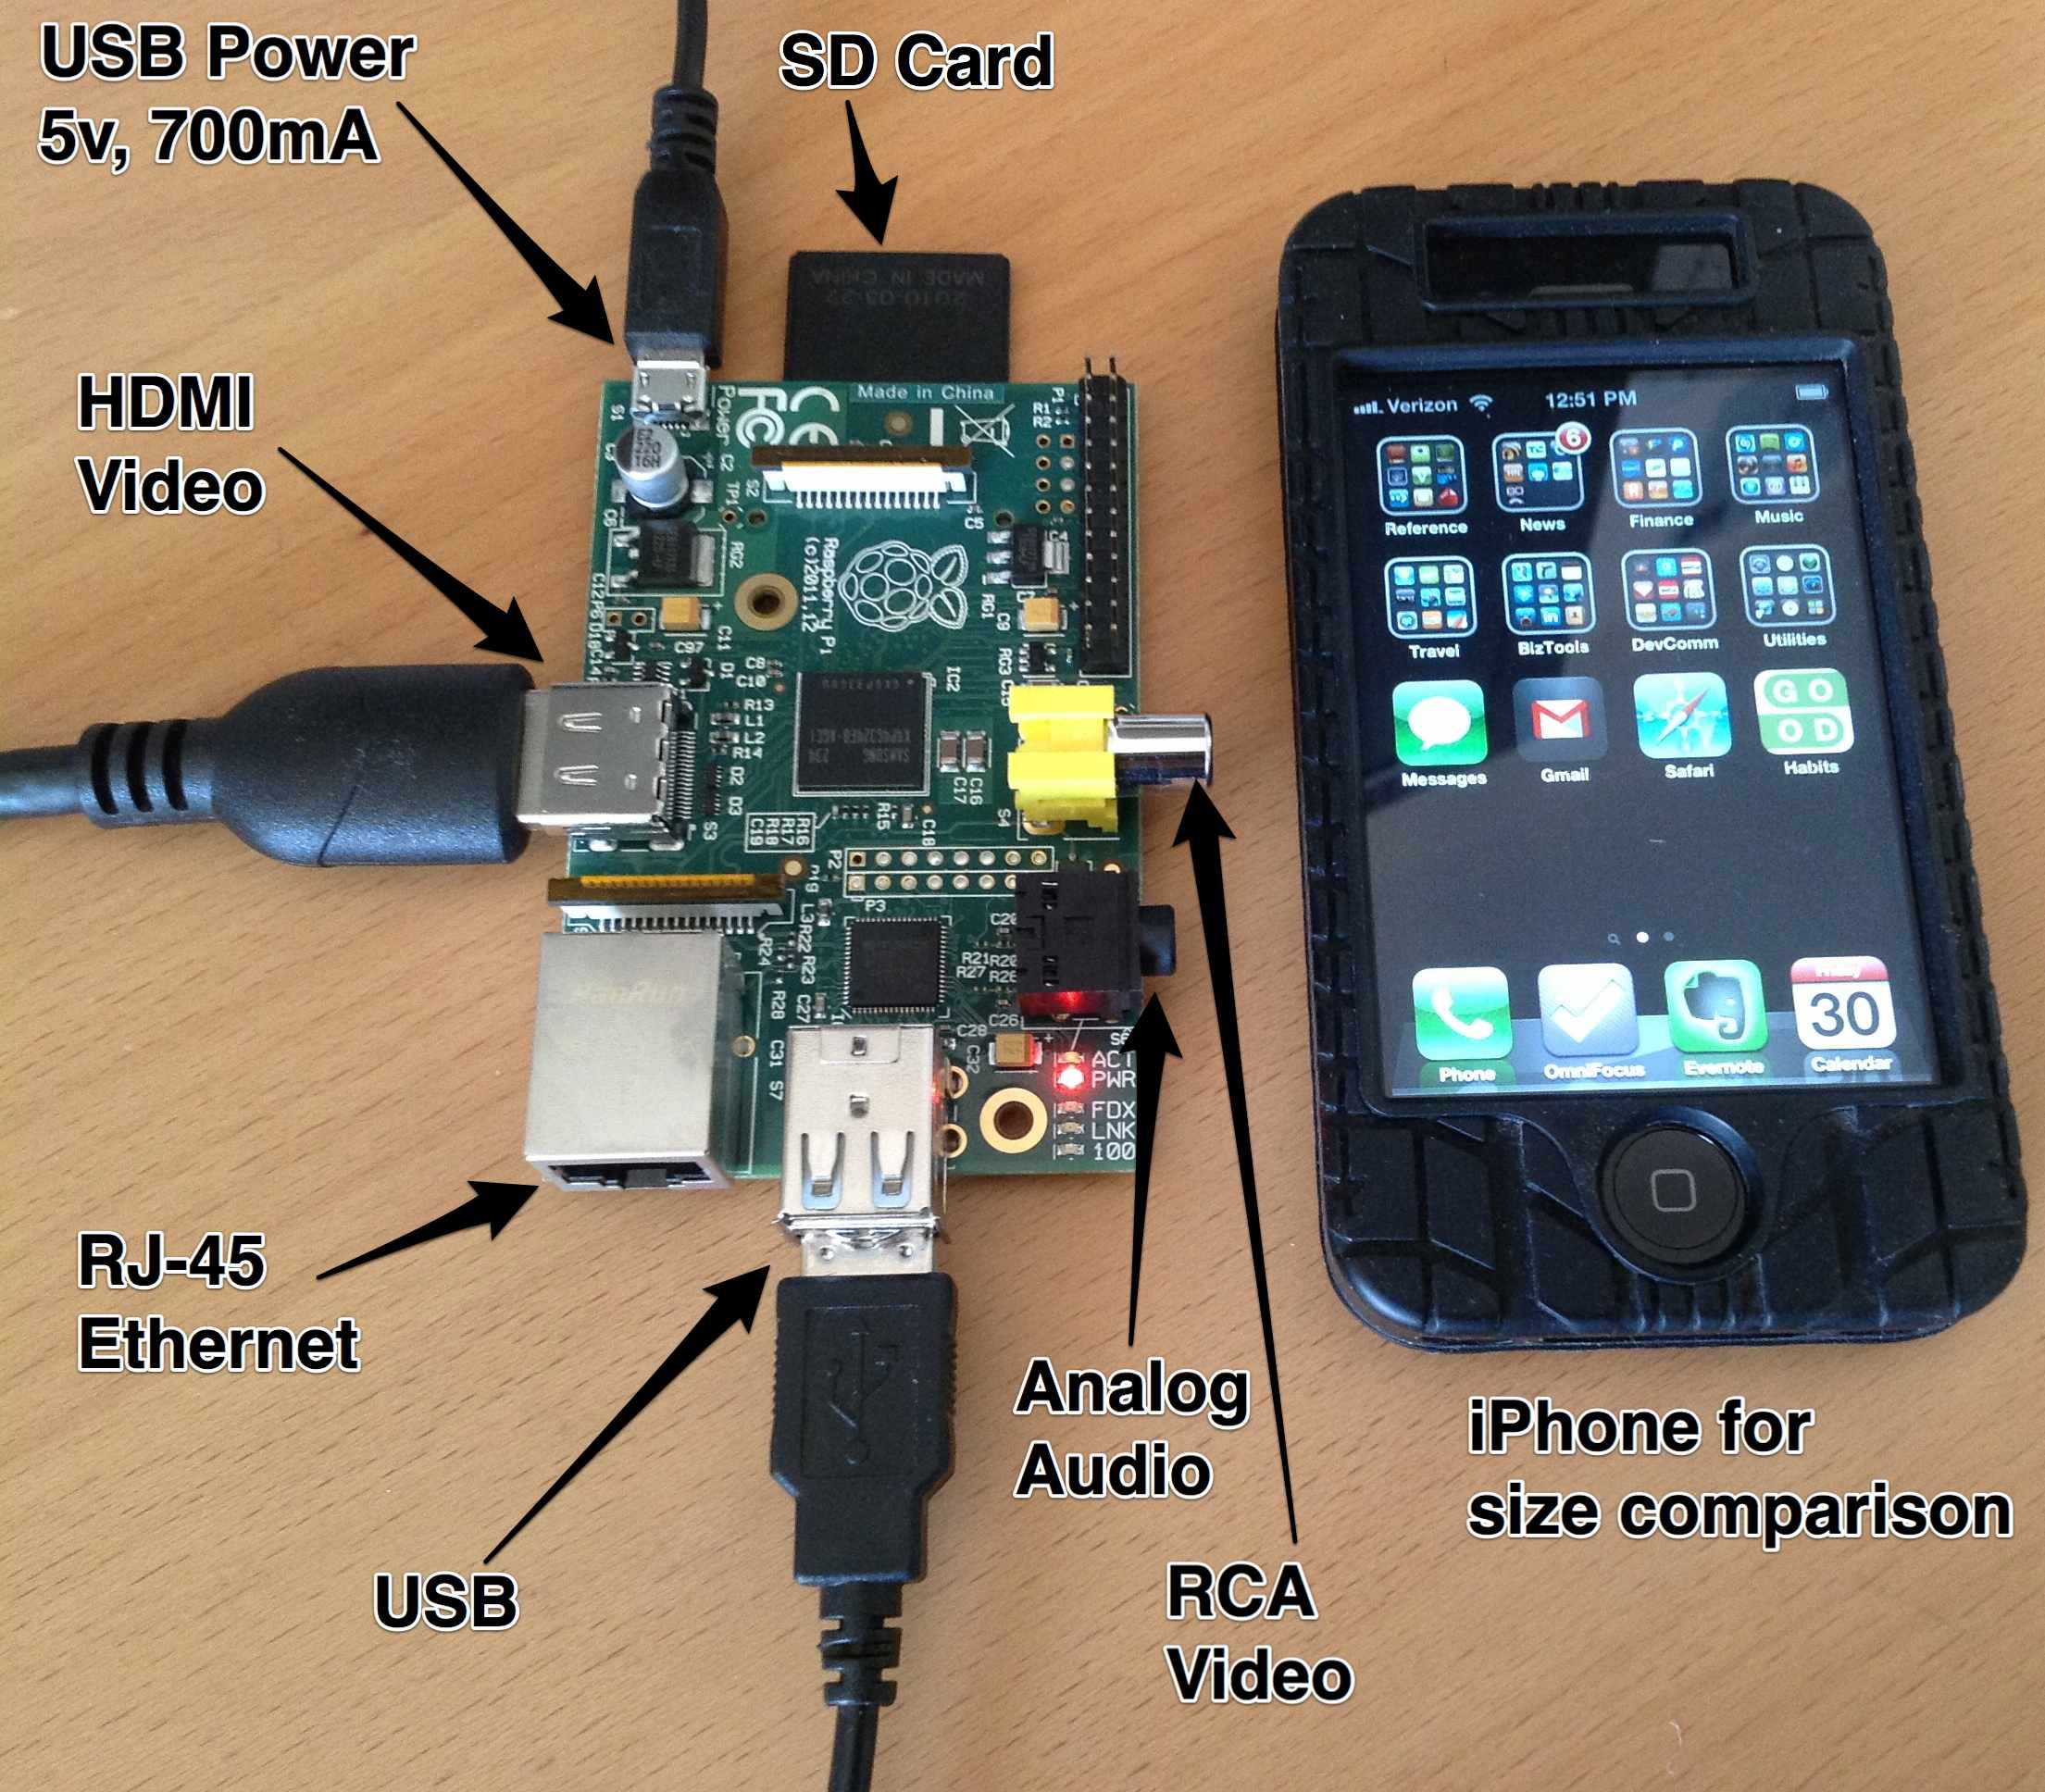
03 Dec 2012 Raspberry Pi is a single-board computer roughly the size of a deck of cards. It’s equipped with an ARM processor that runs Linux. USB ports let you attach a keyboard and mouse. Video is supported via HDMI and RCA. Storage is handled by SD cards. There’s an Ethernet port.
You can buy a Raspberry Pi for $35.00.
Will it Run Ruby?
When my Raspberry Pi arrived, I was curious: Will it run Ruby? How about Rails? This article describes my experience with RVM, Ruby, and Rails on a Raspberry Pi, along with the “gotchas” I encountered along the way.
Why Raspberry Pi?
Raspberry Pi was created by a group of UK educators and engineers with a concern: Inexpensive hobbyist computers like the old Commodore 64 no longer exist. Game consoles continue to get better, but there is no replacement for the Commodore. As a result, young people who might become developers get introduced to the profession as gamers or users of Word or Excel. They begin as consumers, not creators. Sad news, because creators shape the world we all enjoy.
Creators get stronger when they have tools for learning, play, and 10,000 hours of practice. Enter Raspberry Pi. It’s a tiny, inexpensive computer. It runs open source software so it is highly accessible to curious minds that are eager to learn, practice, and play.
Yes, It Will Run Ruby
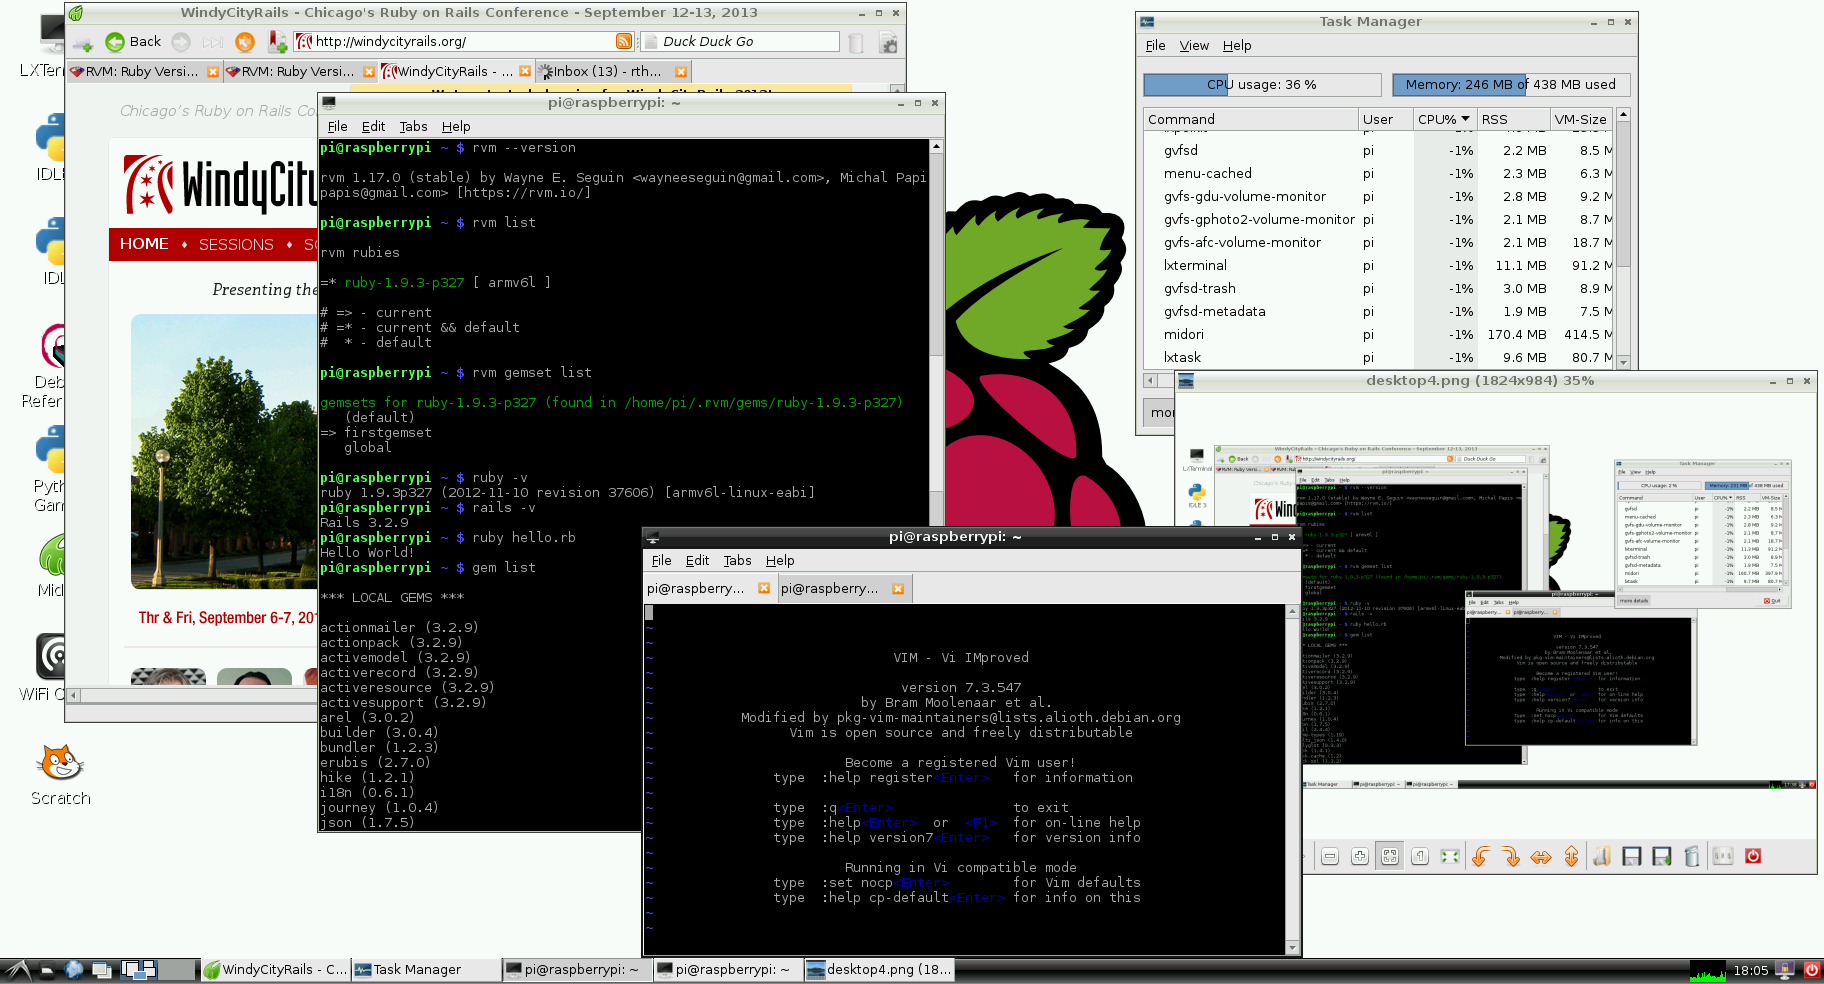
Here’s a screenshot from my Raspberry Pi with the Midori web browser, RVM, Ruby 1.9.3-p327, Rails 3.2.9, Vim 7.3, and other tools. In this shot, I’m using the Pi’s HDMI output to drive a 1080p monitor.

Yes, this tiny, $35 device will drive a monitor at full 1080p HD.
Getting Started
Here’s what you need to get Ruby running on your Raspberry Pi.
- 1 Raspberry Pi with 512MB RAM or more. I bought mine from Newark/element14.
- 1 Monitor that accepts HDMI or RCA video input.
- 1 HDMI or RCA cable, depending on your monitor.
- 1 USB keyboard
- 1 USB mouse
- 1 8GB (or larger) SD card. The instructions recommend 4GB, but I suggest at least 8GB if you expect to run Rails. You’ll need room for gems, git, etc.
- 1 Ethernet cable w/RJ-45 ends.
- 1 high-speed Internet connection.
- A separate computer capable of writing an SD card image, or an SD card pre-configured for Raspberry Pi.
The Pi makers have tested the device with SD cards as large as 32GB, even though 4GB is recommended. Personally, I prefer the larger cards because they allow more room for experiments.
Prepping the SD Card
The Pi’s operating system boots from the SD card. There are several methods for prepping the SD card with the Raspberry Pi system. The easiest: Buy a Pi with a pre-configured SD card.
My Pi arrived before the pre-configured SD card. I’m a little bit impatient when it comes to new gadgets, so I decided to prep an old SD card of my own.
Note: If you’re reading this article, you already know the standard disclaimer about how technology changes rapidly therefore this procedure could be wrong by the time you read this. I’ve included links to references so you can check for updates on your own. You know the risks. Please backup everything that needs it.
References:
- eLinux SD Card Setup. Methods for putting your preferred image on the SD card. I chose the “Copying an image to the SD card in Mac OS X (mostly graphical interface)” method.
- Raspberry Pi Official Downloads. Several SD card images, and a beginners wiki.
Prepping an SD card takes a long time. In my case, it took 23 minutes from the time I executed the SD write command ($ sudo dd...) to the completion of the process. It was a little disconcerting because the system didn’t do anything during that time. No feedback whatsoever. Sounds like an opportunity for a pull request!
Starting the System
To start your Raspberry Pi system:
- Plug the SD card, USB keyboard & mouse, Ethernet cable, and video cable (HDMI or RCA) into their corresponding sockets.
- Plug in the USB power adapter.
There is no power switch. The device is turned on/off by adding or removing the power cable.
Linux will boot in text mode. When the system is done booting, you will be prompted for a username and password. Here are the default credentials:
raspberrypi login: pi
Password: raspberry
Several seconds later, you will be greeted with the $ prompt. You can continue to use the Pi in text mode, or you can start the X Window GUI with:
$ startx
Ruby with RVM
I am a big fan of Ruby Version Manager (RVM). I learn best when I break things. RVM’s handling of Ruby versions and gemsets enables me to recover rapidly and well.
This command will install the latest stable versions of RVM and Ruby:
$ curl -L https://get.rvm.io | bash -s stable --ruby
It took over an hour for Ruby to compile on my Pi. The read/write speed of my SD card (Class 4) could have been a factor. I have a faster (Class 10) SD card on order.
Installing Rails
First, make sure you’re using the version of Ruby you want to use.
$ rvm current
Next, create a gemset and tell RVM that you want to use it.
$ rvm use [version of Ruby you want to use]
$ rvm gemset create firstgemset
$ rvm gemset use firstgemset
And then install Rails as you would on any other ‘nix-based machine.
$ gem install rails
Gotchas
The installation process was relatively smooth. Still, here are a few gotchas I encountered with the Pi:
- I already mentioned this, but it’s worth repeating: It took 23 minutes to write the SD card, and there was no feedback along the way. This wasn’t a big deal since I had been pre-warned by one of the wikis.
- apt-get needed an update before I could install git.
$ sudo apt-get updatedid the trick. - The Pi will do absolutely nothing without a properly configured SD card. You know how a PC will partially boot (to CMOS) even without a hard drive? Not so with the Pi.
- The micro-USB power port requires 700mA or more of current. Most micro-USB power adapters deliver 500mA or less. Raspberry Pi will only boot if the micro-USB provides sufficient amperage. Only one of my several micro-USB adapters met this requirement.
- A 4GB SD card is far too small if you want to do something useful with the Pi. My first Rails installation failed due to size limitations because I was using a 4GB card. Go with 8GB or larger.
- I’m not 100% sure, but I think that a faster SD card will make a difference especially during the compilation of the Ruby interpreter. This is only a guess at this point. I don’t yet know where the bottlenecks are.
Overall, the gotchas were minor.
For Screenshots, Try Scrot
To take screenshots of the Raspberry Pi desktop, I used Scrot (SCReenshOT). Here’s how to install Scrot:
$ sudo apt-get install scrot
After you install Scrot, this command will take a shot of the entire desktop and drop it into a file called desktop.png in your home directory.
$ scrot ~/desktop.png
To pause five seconds before taking the screenshot:
$ sleep 5; scrot ~/desktop.png

Analog TV
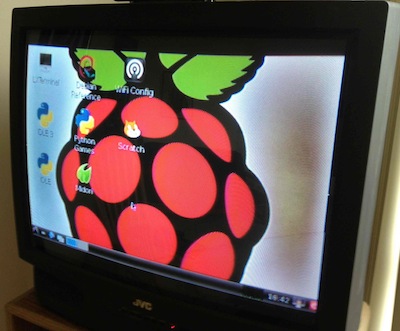
Don’t laugh: I still have an old analog TV in my living room. It’s twelve years old and it still works. Since Raspberry Pi comes with multiple video outupts, analog TVs are useful again.
Here’s Raspberry Pi running with my old analog TV as a monitor. Reminds me of the Commodore 64 days!
Raspberry Pi will work with a wide range of monitors, from HDMI to ancient analog. That makes the Pi accessible to a large audience of hobbyists and developers.
Conclusion
Raspberry Pi will never replace my primary machine because it’s too slow. But it is certainly fast enough for learning. It meets the goals set forth by the engineering team.
I am excited by the learning opportunities offered by Raspberry Pi. To the Raspberry Pi Foundation: Thank you for an impressive device. I wish you much success.
Update: You might also be interested in BeagleBone Black Running Ubuntu.


